porsche macan manual transmission
Porsche Macan Manual Transmission⁚ A Dream Deferred
The Porsche Macan, a popular compact luxury SUV, has captivated enthusiasts with its blend of performance, luxury, and practicality. However, one feature that has consistently been absent from the Macan lineup is a manual transmission. While Porsche offers manual transmissions in other models, the Macan has remained exclusively equipped with the PDK dual-clutch automatic transmission. This has left many drivers who crave the engaging experience of a manual gearbox yearning for a Macan that offers the option of shifting gears themselves.
The Absence of a Manual Option
The lack of a manual transmission option in the Porsche Macan has been a source of disappointment for many enthusiasts. While the Macan is known for its sporty handling and powerful engines, the absence of a manual gearbox has been a significant drawback for those who value the direct connection and engagement that comes with shifting gears themselves. The reasoning behind this decision is multifaceted and likely stems from a combination of factors.
Firstly, Porsche’s focus on performance and efficiency has led them to prioritize the PDK transmission, which offers lightning-fast gear changes and optimized fuel economy. The PDK’s dual-clutch design allows for seamless shifts without any interruption in power delivery, making it a highly effective choice for a performance-oriented SUV. Secondly, the growing popularity of automatic transmissions in the luxury SUV segment has likely influenced Porsche’s decision. Automatic transmissions are increasingly preferred by consumers for their convenience and ease of use, especially in stop-and-go traffic.
Thirdly, the cost of engineering and manufacturing a manual transmission for the Macan could have been a factor. Adding a manual transmission would require additional development and production costs, which could potentially increase the price of the Macan. Porsche has likely weighed these factors carefully and concluded that the benefits of offering a manual transmission did not outweigh the associated costs and potential market demand.
The PDK Transmission⁚ A Worthy Alternative
While the absence of a manual transmission option in the Porsche Macan might be a disappointment for some, the standard PDK (Porsche Doppelkupplungsgetriebe) transmission is a worthy alternative. The PDK is a dual-clutch automatic transmission that offers a number of advantages over a traditional manual gearbox.
Firstly, the PDK is incredibly fast and efficient. Its dual-clutch design allows for seamless gear changes without any interruption in power delivery. This results in a more responsive and engaging driving experience, particularly when accelerating or braking. Secondly, the PDK offers a number of driver-selectable modes, allowing you to tailor the transmission’s behavior to your preferences. Sport mode sharpens the throttle response and holds gears longer, while Comfort mode provides a smoother and more relaxed driving experience.
Additionally, the PDK features a manual mode that allows you to shift gears using the steering wheel paddles. This provides a more engaging and interactive driving experience, while still benefiting from the PDK’s automatic shifting capabilities. Overall, the PDK transmission in the Porsche Macan is a highly capable and sophisticated system that delivers both performance and efficiency. While some enthusiasts might prefer a manual transmission, the PDK is a worthy alternative that offers a compelling driving experience.
The Appeal of a Manual Transmission
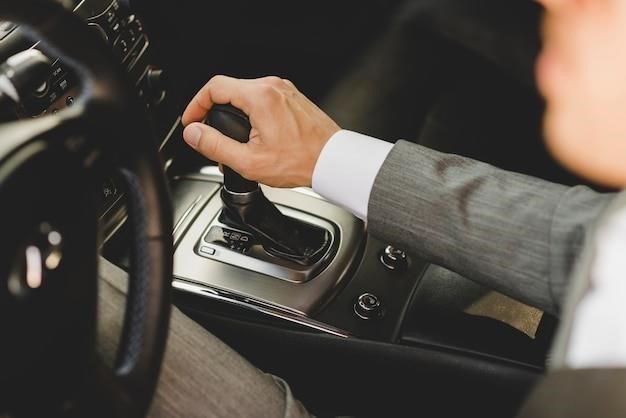
For many driving enthusiasts, a manual transmission represents more than just a way to change gears; it embodies a connection to the car and a sense of control over the driving experience. The tactile feedback of shifting gears, the deliberate engagement of the clutch, and the precise coordination required to smoothly navigate through the gears create a unique and rewarding experience. A manual transmission invites the driver to be actively involved in the driving process, fostering a deeper connection with the vehicle.
Beyond the inherent enjoyment of driving a manual, there are also practical advantages. Many drivers find that a manual transmission offers better fuel economy, particularly in stop-and-go traffic. The ability to control the engine speed through precise gear selection can help optimize fuel consumption. Additionally, a manual transmission can provide a more engaging and rewarding driving experience, particularly on winding roads or in spirited driving situations.
While modern dual-clutch transmissions offer impressive performance and efficiency, they often lack the visceral connection and driver engagement that a manual transmission can provide. The tactile feedback, the precise control, and the inherent sense of control that a manual transmission offers continue to appeal to many driving enthusiasts, making it a cherished and sought-after feature in many vehicles.
The Porsche 718⁚ A Manual Option Available
While the Porsche Macan remains without a manual transmission option, Porsche does offer manual gearboxes in its 718 Cayman and Boxster models. These mid-engine sports cars cater to drivers who seek a more engaging and visceral driving experience, and the availability of a manual transmission fulfills that desire. The 718 models with manual transmissions allow drivers to fully engage with the car’s performance potential, providing a direct connection to the engine and a more rewarding driving experience.
The presence of a manual transmission in the 718 lineup highlights Porsche’s commitment to offering driver-focused options. While the PDK dual-clutch transmission offers exceptional performance and efficiency, the manual transmission provides a distinct and highly sought-after experience for those who value the tactile engagement and control that it offers. The 718 models with manual transmissions exemplify Porsche’s dedication to preserving the driving experience that has made its cars legendary.
The inclusion of a manual transmission in the 718 models serves as a reminder that there is still a place for traditional driving methods in the world of modern performance cars. For enthusiasts who crave the connection and control that a manual transmission provides, the 718 models offer a compelling alternative to the ever-increasing prevalence of automatic transmissions.
The Future of Manual Transmissions in Porsches
The future of manual transmissions in Porsches remains uncertain, particularly in the context of the Macan. While the brand has historically offered manual options in its sports cars, the increasing popularity of automatic transmissions and the growing focus on efficiency and technology have led to a decline in manual transmission offerings across the automotive industry. The Macan, as a vehicle designed for both performance and everyday practicality, may further contribute to this trend.
However, Porsche has demonstrated a commitment to preserving the manual transmission experience in its more driver-focused models, such as the 718 Cayman and Boxster. The continued availability of manual gearboxes in these models suggests that Porsche recognizes the enduring appeal of this traditional driving method for certain enthusiasts. The company’s dedication to offering a choice for drivers who prioritize the tactile engagement and control that a manual transmission provides could influence its decision-making regarding future manual transmission options.
The future of manual transmissions in Porsches, including the Macan, will likely depend on a combination of factors, including market demand, technological advancements, and the brand’s commitment to upholding its heritage of driver-focused performance. While the Macan may continue to be exclusively equipped with the PDK transmission, the future of manual gearboxes in other Porsche models remains a topic of interest and speculation for enthusiasts.
The Macan’s Focus on Performance and Luxury
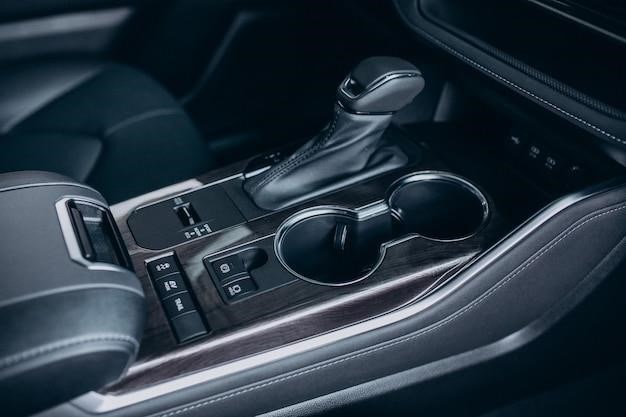
The Porsche Macan is a testament to the brand’s commitment to delivering both performance and luxury in a compact SUV package. While the lack of a manual transmission might disappoint some driving purists, it aligns with the Macan’s overall focus on delivering a refined and engaging driving experience that prioritizes ease of use and comfort. The PDK dual-clutch automatic transmission, standard across the Macan range, contributes to this focus by providing lightning-fast gear changes and a seamless transition between performance and efficiency.
The Macan’s interior, meticulously crafted with high-quality materials and advanced technology, reflects the brand’s dedication to luxury. The focus on comfort and refinement extends to the driving experience, as the Macan’s suspension and handling are tuned for a balance of sportiness and ride quality; This emphasis on performance and luxury resonates with the Macan’s target audience, who seek a vehicle that seamlessly blends everyday practicality with exhilarating driving dynamics.
While the absence of a manual transmission may limit the Macan’s appeal for those who prioritize a pure driving experience, it aligns with the overall design philosophy of the vehicle. The Macan’s focus on performance and luxury is reflected in its comprehensive suite of features, including advanced engine technology, sophisticated suspension systems, and a meticulously appointed interior. This comprehensive approach to delivering a refined and engaging driving experience contributes to the Macan’s enduring popularity in the competitive market of luxury SUVs.
The Macan’s Target Audience
The Porsche Macan caters to a diverse audience seeking a blend of performance, luxury, and practicality in a compact SUV. Its target audience encompasses individuals and families who appreciate the brand’s heritage of engineering excellence and desire a vehicle that seamlessly blends everyday functionality with exhilarating driving dynamics; The Macan’s appeal extends to professionals who value a refined and sophisticated driving experience, as well as those who prioritize comfort and convenience without compromising on performance.
The Macan’s target audience often consists of individuals with discerning tastes, who value a blend of performance and style. They seek a vehicle that stands out from the crowd, offering a unique combination of driving engagement and everyday usability. The Macan’s versatility, capable of handling both city commutes and weekend adventures, resonates with individuals who seek a vehicle that can adapt to their diverse lifestyle needs.
The Macan’s target audience includes those who are drawn to Porsche’s reputation for engineering excellence and desire a vehicle that reflects their success and personal style. The Macan’s combination of luxury features, advanced technology, and exhilarating performance caters to individuals who appreciate a refined driving experience while maintaining a sporty edge. Ultimately, the Macan targets those who value a blend of practicality, performance, and luxury, making it a compelling choice for a diverse range of discerning drivers.
While the Porsche Macan currently lacks a manual transmission option, the absence of this feature has sparked a lively debate among enthusiasts. The PDK dual-clutch automatic transmission, standard in the Macan, offers lightning-fast gear changes and seamless power delivery, making it a formidable choice for performance-oriented driving. However, the allure of a manual transmission remains strong for those who prioritize the engaging and visceral experience of shifting gears themselves.
The Macan’s target audience, seeking a blend of performance, luxury, and practicality, is diverse and includes individuals with discerning tastes who appreciate a vehicle that reflects their success and personal style. The Macan’s combination of luxury features, advanced technology, and exhilarating performance caters to this audience, but the lack of a manual transmission option may deter some drivers who value the tactile connection and control offered by a traditional gearbox.
The future of manual transmissions in Porsches remains uncertain, as the automotive landscape continues to evolve. However, the enduring appeal of manual gearboxes suggests that a Macan with a manual transmission option could potentially find a receptive audience among those seeking a unique and engaging driving experience.